Initialise Amplify CLI
Install and configure the Amplify CLI
The Amplify Command Line Interface (CLI) is a unified toolchain to create AWS cloud services for your app. Let’s go ahead and install the Amplify CLI.
- Install the Amplify CLI to the project with the following command
npm install -g @aws-amplify/cli
Because we’re installing the Amplify CLI globally, you might need to run the command above with sudo.
- Now it’s time to setup the Amplify CLI. Configure Amplify by running the following command:
amplify configure
amplify configure will ask you to sign into the AWS Console.
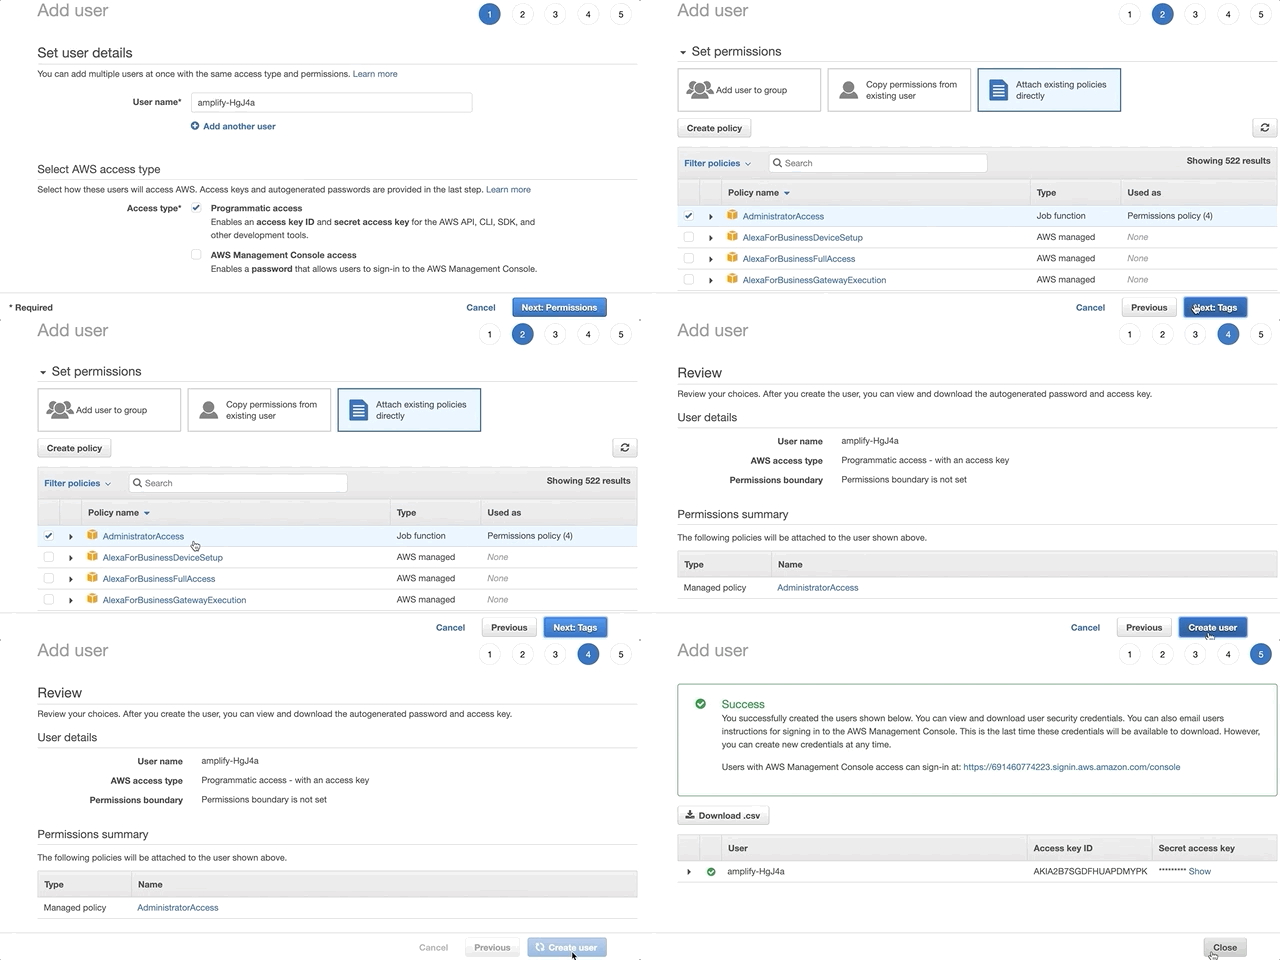
Once you’re signed in, Amplify CLI will ask you to create an IAM user.
Amazon IAM (Identity and Access Management) enables you to manage users and user permissions in AWS. You can learn more about Amazon IAM here.
Specify the AWS Region
? region:  # Your preferred region
Specify the username of the new IAM user:
? user name:  # User name for Amplify IAM user
Complete the user creation using the AWS console
Create a user with AdministratorAccess to your account to provision AWS resources for you like AppSync, Cognito etc.

Once the user is created, Amplify CLI will ask you to provide the accessKeyId and the secretAccessKeyto connect Amplify CLI with your newly created IAM user.
Enter the access key of the newly created user:
? accessKeyId:  # YOUR_ACCESS_KEY_ID
? secretAccessKey:  # YOUR_SECRET_ACCESS_KEY
This would update/create the AWS Profile in your local machine
? Profile Name:  # (default)

Successfully set up the new user.
Initialize a new Amplify backend
Now that we have a running React app, it’s time to set up Amplify so that we can create the necessary backend services needed to support the app.
From the root of the project, run:
amplify init
When you initialize Amplify you’ll be prompted for some information about the app:
Enter a name for the project (travelbuddy-webapp)

# All AWS services you provision for your app are grouped into an "environment"
# A common naming convention is dev, staging, and production
Enter a name for the environment (dev)

# Sometimes the CLI will prompt you to edit a file, it will use this editor to open those files.
Choose your default editor

# Amplify supports JavaScript (Web & React Native), iOS, and Android apps
Choose the type of app that you're building (javascript)

What JavaScript framework are you using (react)

Source directory path (src)

Distribution directory path (build)

Build command (npm run build)

Start command (npm start)

# This is the profile you created with the `amplify configure` command in the introduction step.
Do you want to use an AWS profile
Note the following:
- When you initialize a new Amplify project, a few things happen:
- It creates a top level directory called
amplifythat stores your backend definition. During the tutorial you’ll add capabilities such as a GraphQL API and authentication. As you add features, theamplifyfolder will grow with infrastructure-as-code templates that define your backend stack. Infrastructure-as-code is a best practice way to create a replicable backend stack. - It creates a file called
aws-exports.jsin thesrcdirectory that holds all the configuration for the services you create with Amplify. This is how the Amplify client is able to get the necessary information about your backend services. - It modifies the
.gitignorefile, adding some generated files to the ignore list - A cloud project is created for you in the AWS Amplify Console that can be accessed by running
amplify console. The Console provides a list of backend environments, deep links to provisioned resources per Amplify category, status of recent deployments, and instructions on how to promote, clone, pull, and delete backend resources
Install Amplify Libraries
The first step to using Amplify in the client is to install the necessary dependencies:
npm install aws-amplify @aws-amplify/ui-react
The aws-amplify package is the main library for working with Amplify in your apps. The @aws-amplify/ui-react package includes React specific UI components we’ll use as we build the app.